Thursday, November 30, 2006

Pd-catalysed Cross-Coupling Reactions of Heteroaromatic Carboxylic Acids

A while back Chris published a post on a Science paper entitled:
-
Synthesis of Biaryls via Catalytic Decarboxylative Coupling (DOI: 10.1126/science.1128684).
-
A very interesting piece of work. However, then one our readers known as aa posted the following comment:
-
"Not sure if this is referenced in the Science paper (should be), but similar work was recently reported by a group at Boehringer Ingelheim in JACS. Check out JACS, 2006, 128, 11350-11351. They use palladium catalysis, and heteroaryl carboxylic acids, but the principle is identical."
-
I finally did something about it and read the JACS paper (DOI:10.1021/ja063511f). Now first of all the German dudes who published their stuff in Science would have been hard pressed to cite the Boehringer Ingelheim group since their manuscript was submitted a month before the Boehringer people got round to it. The JACS paper is however very interesting. In fact, I find it even more exciting than the Science paper because these guys are making some pretty nice 
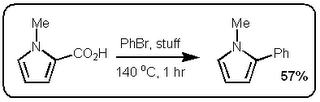
heteroaromatic systems that would make any pharma medchem person wet his pants. Moreover, they are doing it with excellent selectivity and in good yield. Most of the stuff in the paper is done under microwave conditions but they do one old school thermal example that works okay (See Scheme above).
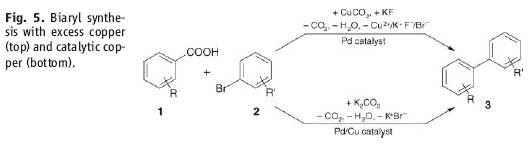
So at first glance these two papers seem very similar. However the postulated mechanisms are quite different. Firstly, the stuff in the Science paper starts of with a decarboxylation / copper insertion followed by a transmetallation and so forth. So in other words all the action is happening where the new bond is being made, like this: However, the stuff in the JACS paper is different. Firstly, it only works if the carboxylic acid is adjacent to the heteroatom. Secondly, palladium adds adjacent to the carboxylic acid via an electrophilic palladation followed by palladium migration and concomitant decarboxylation. Finally the generated palladium species undergoes reductive elimination to form the desired product like this:
In other words quite a different mechanism that doesn't involve a transmetallation step.
Anyway, thanks to aa for the tip. This has been most educational. D!

Tuesday, November 28, 2006

Let's talk about TLCs Part 2 - Hanessian's Stain

Don't you just love that feeling when you are checking your reaction mixture by TLC and no matter which stain you use nothing appears on the plate. If your compound also isn't UV active you've got a real problem. Well the good news is that there is one stain that will do the job for you - Hanessian's Stain! Hanessian's stain is an excellent multi-purpose stain that when used the right way usually gives blue spots (TLC plate A). Since it is a water based stain it requires vigorous heating for development. However, if you overdo it the entire plate goes dark blue (TLC plate B).

Hanessian's Stain Recipe 1
100 ml container
90 ml Water
5 g Ammonium molybdate, (NH4)6Mo7O24-4H20
1 g Cerium sulfate, Ce(SO4)2
10 ml Concentrated sulfuric acid
-
Hanessian's Stain Recipe 2
100 ml container
90 ml Water
2.5 g Ammonium molybdate, (NH4)6Mo7O24-4H20
1 g Cerium ammonium sulfate, Ce(NH4)4(SO4)4-2H2O
10 ml Concentrated sulfuric acid
-
Dissolve ammonium molybdate and cerium sulfate in water (with heating if required) followed by careful addition of concentrated sulfuric acid. Sometimes an insoluble residue is observed. If that happens remove it by filtration. Cerium sulfate can be replaced with Cerium ammonium sulfate which is significantly cheaper (Recipe 2). Hanessian's stain is used just as previously described for the Vanillin Stain although it requires more vigorous heating. Because rather harsh heating is required this stain may prove inefficient with volatile compounds. Also keep in mind that this a very sensitive stain so even trace impurities can appear as significant spots on your TLC plate. D!

Sunday, November 26, 2006

DIY Scoops!

Have you ever noticed how the dry ice scoop or any other communal scoop for that matter just disappears after a while? Where do the scoops go? Is there a secret valley in Africa where the scoops got to die? Anyway, there is a simple and environmentally benign way to produce personal scoops in abundance. All you need is a Stanley knife and an empty appropriately sized plastic container. The type of container used for storing inorganic salts such as sodium sulfate and the like is usually ideal. Basically you just cut the container to produce your own scoop perfectly designed for your requirements. It's free, it's homemade and it's yours! Go make one you know you want to. D!

Thursday, November 23, 2006

Anhydrous solvents

Most organic chemists need dry solvents from time to time and almost every single day you bump into someone who's looking for dry DMF, ether, acetonitrile, THF etc. When I was working in Cambridge this was never a problem. They simply have a still for every single solvent you could imagine. Above there's a picture from the still room in Cambridge. Pretty nice innit? A massive fire hazard but quite handy as long as it doesn't blow up. Now I've moved on and where I work now we've just been inspected by OH&S (Occupational Health & Safety) and they don't like stills because of the fire hazard etc. and I have to say I completely agree with them. Nice as they may be they are dangerous and more or less completely redundant. The solvents you can buy nowadays are of super high quality and do not require distilling so it's basically only distilled in an effort to dry it. Now I will concede that there are stabilisers in many solvents, in particular ethers, but it is very rarely something that will affect your chemistry. So what should you do? The perfect setup that will provide guaranteed anhydrous solvents every day consists of good quality super activated molecular sieves (MS) and a Karl Fischer (KF) apparatus. MS are expensive but you can reduce the cost significantly by buying bulk quantities. We used to get ours from Grace Davison in big drums and they were very very good. The Karl Fischer apparatus (see picture below) can be purchased from Metrohm. All you have to do when you have this set up is add some 3 or 4 Å MS (depending on the solvent) to your solvent close the flask tightly and when you come back the next day take a small quantity out with a syringe and needle and squirt it into you KF apparatus. The display will now show you how many ppm's of water there was in the volume you just added. Everyone doing anhydrous chemistry should have this set up. It's safe, you are always confident about whether your solvent is dry or not and it requires close to no maintenance. Unfortunately, molecular sieves will not dry everybody's favourite solvent THF so you have to hold on to one still. Also you cannot add anything with acidic protons to a KF apparatus successfully. It will think it's all water. So for example acetone or methanol wouldn't work. Regarding MS I believe that you should never attempt to dry them yourself and never recycle them unless they are going into exactly the same solvent (just bin them when they are dead). Many chemists think they are saving money when they reactivate MS. However, I seriously doubt that is the case with the amount of energy not to mention time required to do so. So in other words buy good ones and bin them when they stop working. If you aren't sure whether the MS you've got are any good put a couple in the palm of your hand and add one drop of water. If they get really really hot they a very good and if they only warm up a little bit they are rubbish. If you are in a situation where you can't get good MS I guess you will have to dry them. Apparently one way of doing this is to throw them in a microwave and nuke them on max power until they start glowing. At this point you have to stop immediately unless you want the entire microwave to melt and transfer the MS to a desiccator that you stick on a high vacuum pump (I haven't tried this myself so no guarantees). If you don't feel like burning your department to the ground there is always the good old vacuum oven that most departments have. Just heat them under vacuum for a couple of days and then stick them in a desiccator attached to a high vacuum line. Drying solvents overnight using good 4 Å MS should get acetonitrile, DMF, DMSO, dichloromethane, toluene, ether, 1,2-dichloroethane, chloroform and hexane down to a water content of 10 ppm or less. If you check your freshly distilled THF on the KF it should be around 15 ppm. So for successful living convince your boss or department to get one of these babies and shut down all those damn stills for good. D!

Tuesday, November 21, 2006

New Aryl-Aryl Cross-Coupling

A new aryl-aryl cross-coupling reaction developed by a group in Germany was recently published in Science:

Synthesis of Biaryls via Catalytic Decarboxylative Coupling
Lukas J. Gooßen, Guojun Deng, and Laura M. Levy
Science 4 August 2006: Vol. 313. no. 5787, pp. 662 - 664
DOI: 10.1126/science.1128684

The fancy thing is that they generate the carbon nucleophile in situ by a copper-catalyzed decarboxylation of an arylcarboxylic acid salt. Hence, no lithiation and no handling of organometallic reagents.


So far they have only been able to get the catalytic system (Cu/Pd) working for aryls with coordinating ortho-substituents, while stoichiometric amounts of copper are necessary for other systems. But still pretty sweet.

Monday, November 20, 2006

Let's talk about TLCs Part 1 - Vanillin Stain

I've lost count of the number of times I've searched the web for TLC stain information long ago. I have a feeling that this is a reoccurring issue for many synthetic organic chemists so we've decided to start a "Let's talk about TLCs"-series on Curly Arrow. With time this site will hopefully be the only place you'll ever have to visit for information on TLC stains and related stuff. Not only will we present the recipe for any particular stain but there will also be some comments regarding what it's good for detecting and some pretty pictures so you can see what it looks like after the stain treatment. Let's start the series with a classic: The Vanillin Stain. This is my favourite all purpose stain and after a quick look under the UV lamp this is my next stop. It virtually always works well to give spots in a wide variety of colours which can be handy for spotting what your after when you have multiple spots.
Vanillin Stain Recipe:
100 ml container
6 g Vanillin
1.5 ml Conc. sulfuric acid
95 ml 96% Ethanol
Add the vanillin to your container followed by ethanol to give a clear solution. Carefully add the sulfuric acid. The final product is a clear colourless solution. However, after some dipping of plates it will quickly become a clear yellow solution (see picture above).
How to use the vanillin stain: Run your TLC and let it dry. If you want to check for UV activity you should do so now and not later. Dip the TLC plate in your vanillin stain and heat it using a heat gun (gently at first so that you don't spray the stuff all over your hood) until coloured spots appear. Remember to put the lid back on tightly otherwise it'll dry out.
To the left there's a picture of a TLC plate that I developed today using the vanillin stain.
Alternatively, you can use an atomiser and spray the TLC plate with the stain. This prevents the stain from turning yellow and makes it last a lot longer since you are using much less per treatment. D!

Thursday, November 16, 2006

Dry Column Vacuum Chromatography

Some years ago when I was silly enough to have a real job in the chemical industry we were working in a regular synthetic organic lab but had to scale some of our synthetic work up considerably. This makes everything a bit complicated and time consuming. Now you can get a long way by just buying massive RBF's and so forth and as long as you can recrystallise your products everyone is happy. However, when you have to run your 250 grams of stuff down a quick flash column you have a serious problem. So we were looking for some alternative to flash column chromatography that would allow us to do so. A good friend mine at the Australian Wine Research Institute of all places told me about something he called squat columns and gave me a paper from Aldrichimica Acta on the technique:
"Dry-column" Flash Chromatography, L.M. Harwood, Aldrichimica Acta, 1985, 18, p. 25
Now this paper isn't particularly detailed so we had to mess around with it for quite a long time before we got it right but it was worth it. We were columning really large quantities of stuff this way. I spoke to my former industry colleague about it the other day and he told me that they were doing 500 gram columns now collecting 1 and 2 liter fractions in conical flasks. Anyway, we thought that it made sense to publish a paper with more detailed instructions so that someone might actually try to use it successfully. Fortunately, the referees also liked the idea so we got this paper out on the topic: Dry Column Vacuum Chromatography, D.S. Pedersen and C. Rosenbohm, Synthesis, 2001, pp. 2431-2434

We even took the liberty of renaming the technique because we thought flash was a bit misleading. Basically Dry Column Vacuum Chromatography (DCVC) is an alternative to flash where the solvent is sucked through the column. The solvent is added one fractions at the time (making very precise gradient elution dead easy) and hence the column is sucked almost completely dry between fractions. For the full details read the paper. So what does it look like? Above there's a picture of a 20 gram column I ran the other day. Now this is a big column but it also works with small columns. My favourite size columns have a diameter of 4-6 cm. They are easy to work with and I would typically collect 20 ml fractions. If you want to give DCVC a go but don't want to ask the glass blower for a fancy piece of glassware at first you don't have to. Some of the bits and pieces you need for a simple set up are shown above. A nice and sturdy spatula is essential for good column packing. Quite a few chemist I know use water aspirators for vacuum rather than a fancy diaphragm pump and it seems to work for them so that's also an option. The trick to make this technique work is to get the right silica.
If you use the stuff to the right it will all work fine. However, if you use regular flash silica it will not work. Don't even try it's a waste of time. Regular flash silica is simply to coarse and you can't pack a proper column.

Cool features about DCVC are:
(1) Large scale columns are possible
(2) It's faster than flash. Mainly because you don't collect many fractions (usually 20-30)
(3) You don't use much silica (column is only ~5 cm high) or solvents
(4) Because the column gets sucked dry between fractions you can easily do other stuff whilst running it. Even leaving it for a few hours will not ruin the resolution.

My personal record is seven DCVC's in one day (didn't go home until 10 pm though). However, I wouldn't recommend doing more than four in a day. You start going insane after the fourth column. The technique works so well that I haven't run a flash column in five years and I have no intention of ever doing one again. The columns can normally be recycled. Just give them a good rinse. I usually do something like: MeOH, EtOAc and finally hexane. Seal it up nicely and stick in the fridge. They easily last for a week in the fridge if you seal them up properly. This is how I do it: An old suba seal on the stem a bit of para film on the top with a bit of tape and stick in the fridge in a beaker (see picture).
One important detail that we have discovered since publishing the paper is that one should NOT concentrate the sample to be columned on silica. Instead, you should use Celite (or Kenite). Opposed to silica Celite is very non-polar and hence you can use quite a lot for loading you sample without compromising the resolution. This way you can ensure that you get as much of your compound as possible on to the actual column. If you stick a piece of filter paper on top of the silica column prior to loading the celite it makes it really easy for you to scrape the celite off after running the column so that you can use it once more. Also you should stick a piece of filter paper on top of the kenite so that you don't mess the surface up when you pour the solvent on. Okay I'd better stop here. You obviously need to read the paper before you try this method. Just send an email to curlyarrow@gmail.com to request a copy. D!

Sunday, November 12, 2006

Spiculoic Acid A - sort of

A couple of days ago one of the guys in the lab alerted my attention to a most interesting paper published in Organic Letters by Baldwin and co-workers from Oxford University. It's concerned with the postulated synthesis of a truncated analogue of Spiculoic Acid A by Mehta and Kundu. But before I get into this latest paper from Baldwin and his mates let's go back and see how it all started.
It all took off in 2005 when Mehta and Kundu from the Indian Institute of Science in Bangalore published the following paper:
-
Toward a Total Synthesis of the Novel Polyketide Natural Product Spiculoic Acid A
Goverdhan Mehta and Uday Kumar Kundupp, Org. Lett., 2005, pp. 5569 - 5572
-
Now when I read this paper it actually came across as a nice piece of synthetic work. Unusually, these guys blatantly admit that their synthetic strategy towards the natural product failed. So what they do instead is provide a proof of concept by synthesising an analogue of the natural product using some Diels-Alder chemistry. Okay so that's all fine and dandy. At this point I'd like to say that I am very glad that I didn't referee this paper because things are about to get very hairy. Moving swiftly on to 2006 where Baldwin and co-workers publish the total synthesis of the enantiomer of Spiculonic Acid A in Chemical Communications:
-
Biomimetic synthesis of marine sponge metabolite spiculoic acid A and establishment of the absolute configuration of the natural product
James E. D. Kirkham, Victor Lee and Jack E. Baldwin, Chem. Commun., 2006, p. 2863
DOI: 10.1039/b607035c
-
A very nice piece of synthetic work and a well written paper too. These dudes at Oxford really know what they are doing. So at this point I guess that Baldwin and his mates realised that there were some discrepancies between their data and those of Mehta and Kundu. Hence, they decided to sit down and dissect Mehta and Kundu's paper to figure out what was going on. The result of this little exercise was published in Organic Letters recently:
-
Stereochemical Reassignment of Mehta and Kundu's Spiculoic Acid A Analogue
Kirkham J. E. D., Lee, V. and Baldwin, J. E., Org. Lett., 2006, ASAP Article
DOI: 10.1021/ol062361a
-
Now this paper is really worth a read. We are talking major bitch slapping here. To me the most unbelievable mistake is the incorrect stereochemical assignment of an epoxide obtained by a Sharpless asymmetric epoxidation. 
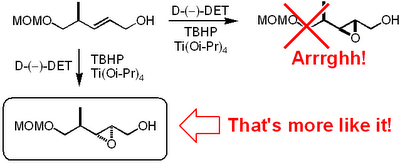
It appears that these Indian dudes haven't been able to use the mnemonic model published by Sharpless to predict the stereochemical outcome. This is what Mehta and Kundu write in their paper regarding the epoxidation:
-
Sharpless epoxidation of allylic alcohol 19 in the presence of the D-tartaric acid diethyl ester was stereoselective (9:1) and afforded the epoxide 20 in a predictable manner with ample precedence.
-
And that's only the beginning. Their NOE interpretations are all over the place and it seems that they can't decide on the final stereochemistry of their Spiculonic Acid A when you compare the structures in the supplementary material with those given in the paper. Here's another brilliant quote from Mehta and Kundu's paper regarding their NOE interpretations (notice the language. One of these guys must have spent some time in the US and bought himself a dictionary):
-
The stereostructure of 9 was delineated on the basis of incisive analyses of its spectral characteristics, particularly the COSY and nOe data.
-
Anyway, hats off to Baldwin and co-workers for spotting all the mistakes and submitting the paper and to Organic Letters for accepting it. It is quite remarkable to think that these guys from Oxford have managed to publish in Organic Letters without conducting a single experiment. I highly recommend reading these three papers in chronological order. D!

Thursday, November 09, 2006

How I learnt to love oxy-mercurations

Well maybe I'm pushing it a bit with the title. I'm not exactly loving oxy-mercurations but I have now added it to the list of synthetic transformations worth remembering. Now I have had a long standing disrespect for the goode olde oxy-mercuration. I have always erroneously assumed that you needed stoichiometric mercury for oxy-mercurations to work. However, oxy-mercurations work really well on paper and I teach the stuff to my undergrads when we do electrophilic addition to alkenes, I do however tell them that it has no place in the lab. Well not any more! Today I completed my first oxy-mercuration and it worked really well and guess what...it's catalytic in mercury! Now I hear that many Universities don't teach this stuff to their undergrads anymore so here's a quick little scheme if you don't have a clue what I'm talking about:

I've shown the reaction for an alkyne starting material but it also works for alkenes to give alcohols rather than ketones.

So why did I end up doing an oxy-mercuration? Well as it turns out we needed to get hold of a serious quantity of acetoxymethyl vinyl ketone and a quick search resulted in the following result:

Now these Scandos did a thorough job and wrote a fairly detailed experimental procedure:
A few small additions to the experimental procedure would be:
1) During the acetylation the reaction is indeed somewhat exothermic and unintentionally I proceeded to boil the crap out of it (boils at ~150 oC) for about 5 minutes.
2) If reactions go jet black and shite starts precipitating from them this should be included in the experimental procedure. This is exactly what happens when you start adding the alkyne to the mercury cocktail. At this stage I was convinced that I had fried my alkyne but apparently black crap means that the reactions is working smoothly! This is what it looks like after the addition of a small amount of the alkyne:3) Removing "part of the acetic acid" should be changed to: "remove most of the acetic acid". Otherwise, you'll end up doing nothing but adding sodium bicarbonate and filtering bucket loads of sodium acetate off for an entire day (just like I did!).

Anyway, to finish this oxy-mercuration business the chemistry works very well but man I was working my ass off for two days to get it all done. There's quite a few time consuming steps in this prep such as the adjusting of the pH to 8 followed by removal of endless quantities of sodium acetate not to mention a vacuum distillation at the very end. D!

Tuesday, November 07, 2006

TEMPO - BAIB oxidation

Have you ever had to oxidise a primary alcohol to a carboxylic acid? Well as you know there is a ridiculous number of methods available. However, a common problem with many of the more traditional methods is that they are very harsh and could potentially rip your molecule apart. Just what you want after a 21-step linear synthesis innit? Moreover, many of the traditional metal-based oxidations can be a serious pain to work up so a mild and simple method would be kinda nice. Well one method that fulfills these criteria has been around for a while. I stumbled across it back in 1999 when I had to do one of these oxidations myself. A very nice piece of work on the oxidation of nucleosides: Now you have to admit that this oxidation uses the coolest reagents ever just judged by their abbreviations.
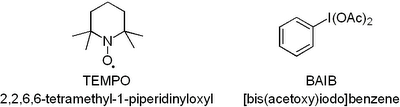
 BAIB should obviously be pronounced BABE. Anyway, at first I had no idea what TEMPO and BAIB were:Both TEMPO and BAIB are commercially available. Don't you just love stuff like TEMPO. A radical you just scoop out of the flask and throw into your RBF! So how does the reaction work? We'll TEMPO does the hard work of oxidising the alcohol. However, as it is only used in a catalytic amount a stoichiometric amount of BAIB is required to regenerate TEMPO. As far as I know no one has yet figured the exact mechanism out. However, for those interested there is a good review in Synthesis that takes a close look at the mechanism and shows the most plausible pathways: Nooy et al., Synthesis, 1996, pp. 1153 - 1174. The paper is worth looking up just to check out the photos of the guys who wrote it - absolutely priceless! Anyway, to get to the point the method is very user-friendly you basically just mix a big pile of BAIB with a small quantity of TEMPO add your alcohol and some acetonitrile and water and stir it for a couple of hours. The method is compatible with a whole range of functional groups (double and triple bonds, esters, ethers, acetals, epoxides, amides, halides, and azides) as well as protection groups (TBDMS, THP, MOM, Boc, Cbz, Benzyl and acetyl etc.). I have recommended the method to a number of people and they have all used it with great success even with very sensitive compounds so I suggest you give it a go if you are in an oxidising mood.
And finally a practical note. If you like me have managed to get stuck in the middle of nowhere and hence has to wait for 9-12 months to receive your BAIB by ship from the US you may consider just making it yourself. I haven't tried this myself but the guys in the lab do it frequently using a simple prep from Synthesis: Kazmierczak et al., Synthesis, 1998, pp. 1721 - 1723. The final stuff is supposed to be bright yellow but the guys assure me that the pseudo-yellowish stuff you for unknown reasons obtain sometimes works just as well. Here's a picture of the pseudo-yellowish BAIB one of the guys made a couple of weeks ago:
If you plan to hold on to it for a while it has to go in the freezer otherwise it goes off fast. Have fun, D!